Tuesday, May 29, 2018

Tasty Tuesday: Stuffed Shells and Cheese - New and Improved

I have had this as a staple or at least easy reoccurring meal on our menu for years I suppose.  I first tried a recipe out of my sister's 30 Day Gourmet Big Book of Freezer Cooking.  I stayed pretty loyal to this for years.  Great recipe and easy to freeze and have on hand.  However, we moved a few times and during one of those moves the recipe book was packed up and I looked for a similar recipe.  Instead I found myself meshing together recipes I found to make one I really like.  And my kids love it too.

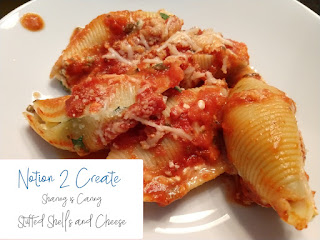
Stuffed Shells and Cheese

1 package of large pasta shells
3-4 cups of spinach leaves, chopped
24 oz cottage cheese (or ricotta but I've always used cottage cheese)
1 C mozarella
2/3 C Parmesan cheese (I used a mix of Grated Parmesan cheese and the more authentic type); reserve some for topping
1 egg
1 Tbsp Basil, finely chopped
1 tsp Salt
1/2 tsp Pepper
Jar of marinara sauce (can substitute other spaghetti sauce in a pinch but Marinara is the best)


  • Preheat oven to 375* F.  Boil water in a large pot and cook your pasta shells until they are al dente (cooking time is usually marked on the package).
  • While pasta is cooking begin mixing together your cheese filling.  Stir together cottage cheese, spinach, cheese, egg, basil, salt and pepper.  
  • Pour a layer of marinara sauce into an 9x13 inch 3 qt  pan.  Drain your shells once cooked.  I usually rinse them with cold water to help with handling.  Stuff each shell with a generous spoonful of the cottage cheese mixture.  Place them on top of the marinara sauce in the baking dish.  Pack them in tightly to make room for all shells you can.  
  • Cover with the remaining sauce and then top with aluminum foil.  Back for 20-25 minutes before removing foil and topping with reserved cheese.  Bake an additional 10-15 minutes until cheese is melted and sauce begins to bubble.  Serve warm. 
Tuesday, May 22, 2018

Tasty Tuesday: Yaki Soba

A few months before I met my husband I went to visit my sister in Japan.  She was teaching English there to students.  It was a wonderful trip and I enjoyed being with my sister in this culture she loved (and still loves) so much.  During my stay we enjoyed lots of different food:  ramen, a rotating sushi bar, gyoza/fried dumplings, homemade Chinese food from one of her friends,etc.

My sister has since returned home and shared a few recipes with us that we love.  Yaki Soba is one of our favorites.  It is so simple to make and only dirties one pan.  My kids ( 7 year old girls and a 3 year old boy) all enjoy it as well so I'd call it kid-friendly.


We use the entire package of Yaki Soba noodles in our recipe and it usually feeds 2-3 adults and our 3 kids.  You can usually find the noodles in the Asian area of your grocers produce or refrigerated area next to wanton wrappers, tofu and the like.  We also find our bag of shredded broccoli slaw in this area.  We originally used philly steak meat from the freezer section at Walmart but recently I've been using Steakums and find it works just as well and then I don't have to make a trip to Walmart for groceries.

Yaki Soba


1 package of Yaki Soba
1 package of broccoli slaw
1/2 package of Steakums
vegetable oil or oil of your choice
water

Directions
Heat about 1-2 tablespoons of oil in a large pan.  Once the oil is hot then throw in your broccoli slaw and saute it until the slaw is slightly tender.  While the slaw is cooking open your package of yaki soba and pierce the individual packages you plan on using.  Remove the sauce packets and place them to the side.  Place the pierced yaki soba in the microwave for 1 minute.  Remove the noodles from the microwave and packaging and place into the pan with the broccoli slaw.


Next sprinkle the sauce packets over the top of the noodles.  Place 1 and 1/2 cups warm water into the pan over the top of the sauce.  Stir the slaw and noodles together being careful not to break the soft noodles.  This mixture should be simmering.  When the noodles and slaw are mixed together, push them to one side of your pan.  Allow the sauce to come to the empty side.

Break apart your frozen meat and place it into the bubbling sauce on the empty side.  Stir this side until the meat is browned.  Once the meat is cooked after a few minutes then mix all of the ingredients together.  Serve hot and enjoy.


We have served this with egg rolls on the side and more non-traditionally with kielbasa sausage or bread.  But generally we eat it on it's own.

We had some bread ends to use so we did buttered toast on the side this time. 


Friday, June 26, 2015

Repurposed: Gerber Cereal Container

Cleaning and organizing sometimes go hand in hand with finding something to use that "it has to be useful" container.  In my effort to clean and organize our hall closet (craft and toy central for our 4 year old girls) I decided to use baby brother's empty cereal container.  I like it.  Now to find other uses for these things.  They do recycle I suppose but they also filled a need I found so yay for that!

Monday, August 4, 2014

Jayne Cobb Hat

Well this is almost a year late in the posting.  I found this pattern on Ravelry last year and aimed to make one for my hubby who is a huge fan of Firefly and Serenity.  I asked for my sister's help and also got quite a bit of instruction from a few YouTube channels.  There really is nothing to stop someone from learning a new skill with all the information out there.

Anyway I was miserable with it for the first while as I thought I remembered what a single crochet was like but somehow fumbled it and was using more of a slip stitch to do this hat.  I was more than half-way through with the pattern and the hat wouldn't have even fit a newborn.  Something had to be wrong.  Yep of course.  This is when YouTube came to my rescue and I relearned some basic skills.  On second attempt (or was it third? or fourth?) I was able to make this hat with no issues and much more quickly.  I think the last "real" attempt only took me a few hours and considering it was my first hat ever attempted I didn't think that was too shabby.

End result (my project link here so you can find the pattern by Dryope).  My stitch/tension is probably a little more snug than most so I think the hat ended up being a little snug.  I may make another someday but we'll see.  It did fit my 2 year old daughters at the time.  Seren was willing to model it for me.  Can you guess where her name came from?? Seren...Serenity.  Yep my husband came up with the idea and I actually loved it.  We later discovered it's a popular name in the UK so it worked out pretty well I think.
Seren Cobb...she was so excited to model it for me
Hubs showing off his new hat and shirt from Christmas 2013


Tuesday, December 3, 2013

Updated Garland On The Cheap (...Okay Free)

I know it's not really original but I thought I would share how I fancied up my $2 garland from Walmart for free.  First off the garland was 9 feet long.  I though it was long enough but when I got it home discovered the ledge in our front room is more like 10 or 11 feet long.  Luckily I already had filler I planned to use around the garland (the bells).  Out came my wire cutters and I snipped the garland into 3 separate pieces so I could spread it out.  I wanted to add some embellishment to it.  Conveniently, I had leftover pine cones from our bird feeder activity so I added these on.
Wash and bake your pine cones on aluminum foiled cookie sheet prior to using for decoration.  I washed mine in hot water and then baked them at 250 degrees for about 30 minutes.  They didn't have sap on them to worry about thank goodness. 
Next using fishing line or possibly jewelry string (I used fishing line), tie it around your pine cone first wiggling it into the center to get a tight hold.  Secure this with a square knot leaving a few inches on both sides of the knot.
Then attach the secured pine cone to your garland with the excess line.  I wrapped mine around the metal center but you would place them on stems of the pine also.  Make sure to tie a couple square knots so it doesn't come lose.  Trim off excess line. 
Somewhat close up of the pine cone attached.  The larger pine cones were also found (last year)...these required more washing and baking than the smaller ones.  Also, I promise my wall isn't so distastefully green as it looks, although I've been dying to paint it since we moved in a year ago. 

Last of all, love yourself for saving money this season...Merry Christmas!

Friday, November 22, 2013

Pine Cone Bird Feeder

Simple.  Easy.  Kid-Friendly.  This was our afternoon project today.  We collected pine cones at the park last week.  No need to clean or bake them.  Just tie on a string or twine then apply peanut butter.  I would advise a couple large spoonfuls in a bowl unless you have a jar that's almost gone.  Roll in or sprinkle with bird seed and you're set.  I imagine wild bird seed might be better for this project (for the birds) but we used what had available.  The girls loved it.  Although so far we haven't seen any birds (darn it!)...maybe it was too late in the season. 


Wednesday, November 20, 2013

What's New On Etsy: Child Aprons

Well I did it again.  I participated in a holiday boutique with my good friend.  It was much more successful.  I was able to clear out some of my stash of towels and I added a new item this time.  Children's aprons.  I figured they were a simple project and a good way to use up some of my larger scraps of material.  They have elastic in the neck straps and snap closures at the hip for the back strap...making it super easy for children to put on and use without too much help.  I'm thinking that my girls will definitely be getting their very own this Christmas.  In the meantime here are some great pictures and the aprons are available here at my Etsy shop.

Tuesday, October 1, 2013

Trying Something New(ish)

It's not completely new to me but I haven't crocheted anything beyond my simple scarves a couple years ago for my kiddos.  I learned to crochet very basically around age 13 and didn't keep it up.  Pretty much the only stitches I know are single and double crochets and chaining.  But my sister has taken a renewed love of it and is trying to reintroduce me to the art as well.  She is a fan of Ravelry.com and now so am I.  Granted I can't do a lot of the projects I want to yet but I'm going to learn some things for sure.

Here is my first project via Jennifer Dickerson.  I started out easy with what she calls a modified granny stripe.  It was soooo easy and fun to remember.  Plus I learned a little more about reading patterns...which has been a mystery to me.  I finished this one in a few hours and now I'm ready to try something different and learn some new stitches.

*Update (10/06/13):  How flattering...I received a message on Ravelry that they want to feature my photo/scarf as a project done with the pattern.  I must have done pretty good for my first project haha


Thursday, September 19, 2013

Fall Crafts for Toddlers

*I've been collecting fall crafts ideas.  I thought I would share some that I plan to do in our house.

1.  Fall Sticky Trees by  Two-Daloo.  Love this blog.  She's a speech-language pathologist and focuses on sensory play and fun. 2. Sun Prints at Parents.com.  3. Leaf Lantern by 5orangepotatoes.  4. Leaf Printing at thisisloveforever.com  5. Salt Dough Prints at thatartistwoman.org.  


My Review:

- Sun prints (#2).  This was super easy and turned out pretty cool also.  We want on a nature walk and picked out leaves and other fall objects (acorns, etc).  My girls enjoyed this.  Then we used a glue stick to attach them to construction paper (Dollar Store) and stuck them up in a sunny window for a couple days.  We then put them in frames from a thrift store.  They turned out great.  I recommend this one.

- Leaf Lantern (#3).  I did this with fake leaves from the Dollar Store and Modge Podge.  This didn't work so well and I wasn't a fan.  This project wasn't completed.  Maybe real leaves would work better.

Tuesday, September 10, 2013

Tasty Tuesday: Half and Half Homemade Pancakes

Half n' Half Homemade Pancakes 

1 1/2 C whole wheat flour
1 1/2 C white flour
1 T baking powder
1 tsp salt
1 T white sugar
2 1/2 C milk
2 eggs
3 T melted butter

Mix all of your dry ingredients together.  Add milk, eggs and butter and mix until smooth with a whisk.  You may need a little more milk.  Drop batter onto a skillet approx 350 degrees F.  I like to use a measuring cup for ease and uniformity.  Once edges dry a little flip and cook both sides until golden brown.  These are also good to make in bulk and freeze.

*You can do this recipe with all whole wheat flour or all white flour.  I like to do half of each, thus the name of the recipe came to be.

Tuesday, August 27, 2013

Tasty Tuesday: Homemade Gyoza / Potstickers

I'll be honest I don't know the difference between the two.  I love them both.  Menus where I live seem to list both names almost synonymous with what shows up on my plate.  So call it whatever you want and I'll call them delicious.  This recipe comes from my sister who lived in Japan for a time teaching English and conversational English.

Homemade Gyoza / Potstickers
1Cabbage (Naptha supposedly works best; I used standard my first time making it)
1/2 lbGround pork or turkey (I used 1 lb ground turkey)
3 tspSesame oil
3 tspSoy sauce
1 1/2 tspGround ginger
1 1/2 tspGround garlic
1 1/2 tspSalt
2                packages of wonton wrappers
Cut up cabbage into very small pieces. Put in bowl and add salt. The salt helps to purge some of the water out of the cabbage.  Squeeze cabbage to remove excess water before mixing with meat.  I also placed it on paper towels to press some of the water out. 

Mix remaining ingredients with cabbage.  You'll want to use your hands for this to be effective. 

Put a small amount of the mixture in the middle of wonton wrapper and fold.  The square type wontons fold over into a triangle and then connect the two corners.  Use warm water to seal the wontons and avoid getting the mixture on the edges. The back of  most packaging has helpful instructions and pictures.

Freeze if desired.  Flash freeze first (on a cookie sheet or flat surface) until frozen and not sticky.  After flash freezing you can place them into ziploc bags.
COOKING: Add 1 to 2 T oil to pan and heat over med-high. Fry bottoms of gyoza until golden brown. Add water to pan until bottom is covered but not too deep (1/4 c or less). Cover with lid and cook for 7-8 min or until bubbling sound changes to a sizzle. Serve with rice.

DIP: soy sauce and couple drops of chili oil (or even tabasco) and small amount of vinegar to taste.

* I made approx 1 gallon size freezer bag of gyoza / pot stickers with this recipe.  It works great for freezing...just add a couple more minutes of cook time.  When I cook mine I'll try to remember to add a couple more photos.

Wednesday, August 7, 2013

Scrub A Dub Dub

I never thought much of cleaning out all the water toys we use for bath time around here.  Scrubbing the outside yes but not so much the inside.  Then I started noticing a duck getting "shadows" and Pluto the same.  So I got some hot water and sucked it inside, shook them vigorously and squeezed it out.  Nasty!  Brownish gray sludge-like mold or growth of some kind came out.  I cleaned them all out the same way.  Disgusting.  I let my kids bath with this? Ewwww.   I thought it was just my severe neglect the first time that caused it to be so gross but a month or two passed and I just cleaned them out again the other day.  Not as horrific but if you need motivation to clean and seal yours (the holes on these will be hit with a hot glue gun tonight) look no further than these pictures.
Left: the number of toys cleaned (not massive)               Right:  the nasty mold and/or residue that came out

Thursday, July 18, 2013

Planning Equals Motivation

One can hope right?

In an effort to get more done in a day...I'm in my pajama bottoms at 3 pm so you could say I have been feeling unmotivated recently.  I am potty training my 2 1/2 year old twin girls though so there is that excuse. But the committee (made up of well --- me) has spoken and there is need for some organization and accomplishment around here.  This is also definitely being motivated by a recent change of my husband's work schedule and less time together as a family and wanting to do more around the house.

I bring you my road map.  My blue print.  My calendar.  My plan.  Let's see how it flies.
I made sure to leave room to write things in day-to-day.  Also the following are ideas to fill my daily activities with our girls:
- Make Something Monday:  food, craft, blanket fort...something will be made
- Take A Trip: go to the park, walk or hike, museum, play dates...get out of the house
- Wet & Wild: pool day outside, splash pad or something wet or messy
- Whimsy / Imagine: imagination games and pretend play
- Think / Experiment: science experiments, learn something new...grow that brain
- Library: Story time or check out a new book or movie
- Fresh & Fun: try out something new and fun (ideas on Pinterest or internet)
- Family Night: spend time as a family or with family/friends
The Original


Tuesday, July 16, 2013

Tasty Tuesday: Ham Fried Rice

My mom has been making the best ham fried rice since I can remember.  It's super yummy.  Probably not really good for you but the taste says "eat me anyway".  I do of course.  Plus it's a recipe that leaves leftovers for work lunches or leftover night (we've been doing more of this to save on our budget).

Ham Fried Rice

1 stick of butter
6 eggs - scrambled in a bowl
3/4 C of frozen peas and carrots
8 oz cubed ham
4 cups cooked rice
Soy sauce
salt and pepper
1/2 can bean sprouts (optional - my girls won't eat them so we forego usually)


In a large skillet heat up stick of butter until it's melted and sizzles a little.  Pour in your beaten eggs and scramble them.  Next add ham and allow it time to heat up (pre-cubed is already cooked).  Then add frozen peas and carrots (I use about 1/2 the package) and give this time to thaw and heat.  Once everything in the skillet is cooked combine it with your cooked rice in a large bowl (this helps to avoid spilling).  Serve while still hot or warm.  It does reheat really well for leftovers as well.

Wednesday, July 10, 2013

ROAD TRIP: 2 Year Old Twins


This wasn't a short trip.  We are talking about a cross country trip with our 2 year old twins (32 hours... driving time only).  The mother load.  You can say it...we're insane!

I read and brainstormed for weeks on what to entertain them with.  What essential gear I needed and how to cut corners (because who can afford $20+ each just for a lap tray that they may hate).  So like many crazy moms who find their tips and tricks in the world of road trips...I'm sharing my wealth of knowledge.  Come let me impart my wisdom.

PRE-TRIP
I took some advice from one blog I read.  That was to clean my car out from fender to bumper ahead of time (vacuum every nook and cranny, scrub down and remove junk).  As parents, especially of little ones, we all know the damage and mess that is in our car from day to day.  I felt so much better starting out with a clean car, even knowing I would arrive back home with a mess after the trip.

NEW
Never seen or haven't seen in a few weeks.  This was my plan of attack.  New $1 store toys...standard protocol here.  Hiding their favorites for a few weeks before hand.  Bringing out a new arsenal when tantrums are imminent.

I bagged up a snack and a new toy in lunch bags and labeled them with the day and hour...I didn't want to blow my load in one day.  I didn't stick to the day/hour in the end but it did help to spread it out.  This was perfect.  The girls loved the "prizes" and it was a helpful distraction when bums were getting sore and destinations were a little more of a stretch.  I've read that some parents are against the "bribing" but I say it's for my sanity and my kids happiness.  When this got a little old and the crank still set in I also brought them into gas station stops to pick out a treat.  And no they don't expect this type of thing now that we are home and back into our day to day.

ARSENAL / GEAR
What road trip blog post would be complete without a list of the arsenal to bring?

Tuesday, June 11, 2013

Tasty Tuesday: Homemade Mac & Cheese

One of the first meals my little Seren learned to request was Mac & Cheese.  I would ask what my girls wanted to eat and she would say " 'n cheese".  She loves it.  Both my girls do.  It's one way I can guarantee a well eaten lunch with them.

Homemade Mac & Cheese 
*serves two toddlers with some to spare
1 cup of elbow macaroni (I buy this in bulk)
1 tsp to 2 tsp of Cheese Sprinkles (optional; sold at Smith's in my area)
2 or 3 Tbsp of milk
1 Tbsp of flour
1/2 C shredded cheddar (medium or sharp)
Parmesan Cheese (optional)

*these are all guesses on measurement...I don't actually measure anything which is one reason I love this recipe.


Boil water and cook your macaroni until it's tender.  Drain water.  Sprinkle with cheese sprinkles (optional; I do this for extra cheesy flavor but I think with sharp cheddar you could leave it out).  Add milk and stir.  Add cheese and flour while still over low heat.  Stir until cheese is melted.  Top with parmesan cheese (real or canned).  Let cool before serving.


Friday, May 24, 2013

Personalized Wedding Picture...

I've been trying to find different things to decorate our newly remodeled bedroom.  I had recently pinned something about how to make your master bedroom your own...it included things like not doing chores (laundry folding, etc) in this room, adding romantic lighting and personalizing it with couple things.  I liked the idea of bringing the lyrics to our wedding song into our room.  The words and meaning were the reason we had chosen it.  When I Fall in Love by Nat King Cole.  Classic.  Timeless.  Never ending.  Here is what I came up with using photo editing software.  I love it.  Now to just find something to frame it and somewhere to hang it.

* Want one of your own?  This is available (personalized of course) on my Etsy Shop.  Stop by and use coupon code: N2CBlog10 for 10% off your total purchase.

Thursday, May 23, 2013

FoodPlanner App...


When my husband told me he was getting us both a Nexus 7 tablet (because you know two of those cost the same as one iPad)...I had no idea what I would do with it.  I still haven't put it to great use I'm sure but I do enjoy it a lot.  Our girls also have had hours of fun and educational apps put to use on it (more on that later). They are whizzes at puzzles and I think it has helped to grow their vocabulary...granted we try to limit their use of them still.
One thing I did decide to do with my tablet was to use it for organizing my grocery shopping and menu planning...

Friday, May 17, 2013

Maybe Warnings Should Be Heeded...


How many times have you looked at the age limits or warnings on random little toys or activities and after evaluating it yourself thought...eh they're old enough what harm can it do, looks safe enough.  Well I've done the same or maybe I stand alone on this.  In my case it was a 3 yr + recommendation with a 0-3 yrs and a frowning face next to it.

Tuesday, May 14, 2013

Tasty Tuesday: Baked Tomato Mozzarella Salad

Baked Tomato and Mozzarella salad
6Roma tomatoes; thinly sliced
3 tbspOlive oil
Sea salt and ground pepper to taste
8 ozFresh mozarella ball; cubed
2 tbspFresh basil; chopped
1 clove
Roasted garlic ; mashed into paste
1/8 cBalsamic vinegar (original calls for 1/4 c; I only use a few splashes...this is the trick between good and great) 
1/2 cSliced olives (my spin on it...not original recipe)