Showing posts with label under $5. Show all posts

Friday, June 22, 2012

Free Craft Friday -- Keepsake Pillow

My husband and I first met in person on August 14, 2006.  He work a t-shirt from his favorite band at the time (Lagwagon) and I wore a black shirt with these camoflauge cargo shorts.  We had an amazing first date.  He took me to a restaurant that his family visited every Labor Day weekend.  I joked it was a dive as it was the first time I'd eaten there although I lived much closer to it than he.  We laughed over "stupid ash chicken" they had burnt my orange chicken and went on to enjoy the movie Goonies at the movies in the park in Ogden.  A little over a year later we were married in October 2007.  The t-shirt and shorts were still frequently worn and finally this summer (2012) they both had enough.  His t-shirt had developed holes at the seams and armpits and my shorts finally split down the inseam.  I didn't really want to get rid of either item.  So I asked my husband if he would mind if I turn his favorite t-shirt into a keepsake of our first date.  He agreed and this totally awesome pillow was born.

Keepsake Pillow

Materials:
-significant clothing from dates, special occassions, etc.
-scissors
-pins
-thread and need or sewing machine


Step 1.  Determine the size of pillow you wish to make.  Make sure you have enough material to cover this size.  You could a pillow form but I decided to just use some extra batting/stuffing I had left over from another project.


Step 2.  Piece your project together.  For me this meant measuring my husbands t-shirt to include the image as well as some material for bordering.  I was then able to piece together a back on the pillow with my shorts.  I cut them apart at the seams and tried to use the least worn pieces for the pillow.  I then pinned the back together and sewed this first (really a mesh of different sizes and shapes).  I pieced the back together making sure that it would oversize the t-shirt piece (size of pillow).


Step 3.  Trim down both from and back pieces of material to be the same size.  In my case I trimmed the shorts to be the same size as the t-shirt piece.  I laid out the t-shirt on top of my sewn shorts and then trimmed off the excess.

Step 4.  Pin both pieces with right sides together and sew along the outter edge with a 1/2" seam.  Leave a hole approximately 2 to 3" in order to stuff the pillow.  If you use a pillow form this "hole" will need to large enough to put your pillow in.

Step 5.  Stuff your pillow.  To finish use needle and thread to sew up the opening in the pillow with an invisible stitch.

*I'm sure there are other ways to form a pillow with remnant clothing, etc.  I simply went with the simplest of ways and one that I knew I would have enough material for.   And yes the pictures are crap on this one...serves me right for using my less than desirable camera.

Friday, May 25, 2012

Free Craft Friday -- Bookmarks

Hello? Miss me?  I have been off in my real life for quite some time.  Also the giveaway never really did anything so I gave up some interest in this blog.  But mostly things were pretty busy and have only started feeling a little more in control.  We had our house on the market, we updated the kitchen, which then had two offers directly after the remodel (apparently an update sells houses quick), so then we packed up and moved out in somewhat of hurry and now we have settled into my in-laws basement temporarily (ie living the dream).  But we are hoping to turn around and find the perfect home and location soon.
So anyway as luck would have it as we were packing up I found an old craft that I did a number of years ago.  I decided to bring this project with me to our new digs to give myself something to do.  Basically this craft is using embroidery thread to make bookmarks.

 Materials:
embroidery thread (I usually use between 4-6 strands of coordinating colors)
beads (small, medium, large and decorative)
scissors
clamp/clothes pin (optional)

Step 1:  Decide on a color scheme and general look you want for the bookmark.  I like to add heavier beads to dangle off the ends.  Use small beads or no beads for the part of the bookmark that will go inside the book.

Step 2:  If you use a long piece you can start a knot at the length of "dangle you want on the first end.  Then just let creativity flow...add beads, charms, decorative knotting and braiding, etc to make your bookmark end.

Step 3:  Once you have one end of your bookmark done, work through the middle.  I usually only braid or use very small bead with this part.  It will only be seen by the reader, it allows the book to close easily and also you don't want to damage the book pages with large beads.  When you finish the length you need for the book tie a knot leaving yourself room to add another "tail" to the book mark.

Step 4:  Similar to Step 1 work beads and charms onto the tail end of the bookmark.  I like to knot between each section or theme of beading to keep things more separate and pleasing to my eye.  Make sure to knot the ends of each tail securely.  I also recommend using super glue to keep it from coming loose.

Step 5:  Place in a book for decoration, use this with your reading or give as a gift.  Who knows maybe this craft will become obsolete if Kindles and tablets keep taking over the world of book.

Friday, February 17, 2012

Free Craft Friday -- Wire Accessory Organizer

I was cleaning out junk for selling our house when I came across my old wire cube storage.  About the time that the wire hit the bottom of my outside trash can the idea of turning them into this occurred to me instead.  I dug it out (yep I dumpster dove in my own trash can) and got to work.

Materials
-Wire cube (one side piece no extras)
-Ribbon
-glue gun
-scissors
-lighter
*I made this for FREE but I'm quoting under $5 to include cost of ribbon.

Step 1.  Arrange a pattern either in your mind or on the wire cube that you want to follow with your ribbon.  Don't worry about pre-cutting ribbon...do this as you go.

Step 2.  Loop your ribbon around the back of wire cube and hot glue to the back of ribbon.  Then proceed to weave your ribbon through the wire until you get to the opposite side.  Pull ribbon tight and wrap it around the wire and got glue to the back again.

*I promise pictures are coming;  my laptop crashed a while back and I think these pictures (done before the holidays) went with it.

Step 3.  Continue with your pattern by repeating step 2 until it is complete.  Then mount on the wall with a couple nails in the corners and you're done.  Decorate with hair clips (alligator work best but I've hung snap  types over the ribbon also--unsnapped of course)

Tuesday, January 31, 2012

First Birthday -- 12 Month Banner

This was my absolute favorite thing to put together for our girls first birthday.  I saw variations of these all over pinterest and it instantly became my must have decoration (and keepsake) for their birthday.  I went off of this one from Modern Parent Messy Kids but with a definite variation as I wanted circles and a little background color/paper.

Materials Needed:
- 13 Large Paint Chip samples (per banner) - (FREE)
- 1 or 2 sheets of scrapbook paper ($1)
- 1 pack of number stickers ($2.50)
- 1 pack of letter stickers ($1) 
- pictures galore (1 picture for each month - $1.50 or FREE if you already have some on hand)
- 3 round objects in various sizes (I used a tin candle can, a spool of ribbon and a measuring cup)
-scissors
-glue stick

Step 1: Cut out rounds of your pictures, paint chips and scrapbook paper.  I used my largest circle to cut out the paint chip, then next largest for the paper and then smallest circle for the picture.  You could do this in different order.

Step 2:  After figuring out your layout preference; Glue your bottom layer to your middle layer.  After gluing I placed them under a heavy book to prevent curling. 

Step 3:  Once your bottom/middle layer are dried then glue your pictures onto the paper.  Once again I dried these under a heavy book to prevent curling. 

Step 4:  After all layers of paper and pictures are dried then add a number to each picture to display the month that it represents in your child's life.  I put month 12 in a larger middle picture and then NB (newborn) through 11 months on the sides.  This made an even 6 pictures per side. 

Step 5:  Tape, staple, clip or otherwise fasten your pictures to yarn, string, wire, crochete thread (my choice), hemp string or whatever else strike your fancy or decor motif.

I couldn't help but share pictures (close up) of both banners I made.  I can't be playing favorites now can I??  Love these girls!!


*I had most of my materials on hand so I am putting this down as an Under $5 project (it might cost a couple dollars more if you have to buy supplies or pictures).

Friday, January 27, 2012

Free Craft Friday -- Gripper Socks

In theory these look like a great idea right?  I thought so too.  Our one-year old twins are up and cruising but socks cause slipping.  And laminate floor causes cold toes.  And I didn't want to buy a bunch of socks with gripping.  So I bought some puff paint ($1 a bottle) and put these together.  Maybe if I had older kids they could comment as to the effectiveness but I can't tell the difference beyond them becoming more sure footed.  But they were fun to make and a cute touch.


First Birthday -- Cupcake Wreath

Due to the girls birthday being 3 days after Christmas I wanted to get rid of anything Christmas related (at least upstairs where the party was held) and add a bit of birthday decoration and fun color.  One thing I came across that I found fun when dealing with cupcake liners was a ball with cupcake liners stuck into the middle with pins and glue.  I didn't have time or patience to do a bunch of balls but I thought this would be cute as a door wreath.
I stole another idea to use pipe foam covers to form a wreath.  It bent as was the prediction on one site and so I inserted a wire hanger through the middle to maintain the shape.  Then I went to town with my cupcake liners and straight pins.  I didn't use glue as I only expected this to last a day or two and didn't want to take the extra time.  I enjoyed how it turned out and I still have it hanging up (in the house of course now...it would have never lasted in the snow)

Also loving a couple other ideas for cupcake liners...check these out.  Oh the things you never knew you could do with a cupcake liner:

&

Friday, January 13, 2012

Free Craft Friday -- Seat Belt Covers

We recently transitioned the girls into convertible car seats (still rear facing...they don't even weigh 20 lbs if we wanted to turn them around haha).  I thought this would get rid of the "belt burn" that Seren often got on her neck when we tightened the belts down with the infant seats.  It didn't.  Kendall even got one or two with this new seat style.  They weren't a fan of them of course so I went online and found these adorable seat belt covers and an awesome tutorial by Jess at CraftinessIsNotOptional.  Once again I'm not going to post a tutorial because this one is awesome...no need to even modify.

-3 3/4" long; fit and used on my Evenflo Tribute carseats

-P.S.  Most instruction manuals will say that you can't add anything to the seat or it compromises the safety.  I feel okay putting these on the seat as they are small and don't seem to change how the belt or harness works or fits (I'll try to snap a picture once in place...or check out the tutorial pictures).  Anyone with more experience or knowledge have more to say or feel on this topic?  (I'm curious and not out to argue;  I think we can safely say we are all in it for our kids' safety)

-my under $5 estimate is based on the fact I bought materials to make 2 sets of seat belt covers for around $8...so one set would be relatively cheap (plus I bought too much fabric and have quite a bit left over).

Friday, December 9, 2011

Free Craft Friday -- Holiday Snow Tree

This is a craft idea that came to me while scanning pinterest.com (what craft nerd isn't inspired there?)  Anyway I saw a recipe for shaving cream snow paint and thought of my unfinished Scrapbook Paper Tree and a new idea was born:

Holiday Snow Tree
Materials:
-tree branches (Free...I stole them off our maple tree this time)
-foam shaving cream (Free...I stole this from my husband; $1 if you buy it)
-Elmer's glue ($0.25 on after-school clearance at Walmart)
-paint brush
-mini ornaments ($3.50 on sale at Michaels)
-vase (Free or hit up your local thrift store for a cheapy)

Step 1.  Arrange your tree branches.  I arranged them and then tied them together below the vase line with some yarn (you don't have to do this).

Step 2.  Mix together equal parts foam shaving cream and Elmers glue.
Step 3.  "Paint" your tree with "snow".  Keep in mind the way that snow would naturally be found on a tree (forks in branches and trunk, top edges, knots in the branch, etc).  I liked getting somewhat large globs of "snow" on my brush and dragging in along the branch where I wanted it to rest.  Also painting "snow" between the joining forks in the branch.
Step 4. Allow to dry overnight so the snow hardens up somewhat.  Then decorate with miniature or small ornaments.

*Notion2Craft original means I didn't find this project elsewhere...although I wouldn't dare say it's never been done before*

Friday, December 2, 2011

Free Craft Friday -- Paint Splatter Ornaments

Materials:
-clear ornaments ($3 estimate; Michaels with 40% coupon)
-acrylic paint ($1 a bottle)
-paint thinner
                                    

Step 1.  Put a couple drops of you first color into the ornament.  Add just a small amount (drops) of paint thinner into the ornament.  You might need to use a tooth pick or other stick to mix the two a little.  Hold a gloved (or sandwich bagged) finger over the open end of the ornament and shake like crazy.

Step 2.  Put a couple drops of your second color and paint thinner into the ornament.  Shake like crazy yet again.

Step 3.  Once you have achieved your desired look leave the ornament cap off and allow the ornaments to air out overnight (outside wouldn't be a bad idea).  Place the caps on after airing out and bingo bango you have an awesome ornament. 

*varying your paint and paint thinner combination will affect results...have fun and experiment.  The red/white one had a little more paint thinner and the green/red one had less.*

                                   
*another set we made that year (I don't like these as much).  Paint the outside with Christmas scenery or whatever pleases you and then add miniature items inside the ornament*

- I consider this a kid-friendly craft when properly supervised by adults due to paint thinner being involved.

-We made these a few years ago so pricing is estimated.  Notion 2 Craft original means I didn't find this idea on another blog...I'm sure it's not that original though ;) 

Thursday, December 1, 2011

First Christmas Crafting

We are nerds.  Okay well I'm a craft nerd.  It is our twins first Christmas and I'm having fun with little crafts and wrapping up pajamas for Christmas Eve (a simple but not exactly original tradition that we are carrying on from my family).  I also wanted to pick out the ever popular Baby's First Christmas ornament for them but never really found one I loved.  Then I saw these and thought they would be fun to make and also for us and them to remember how small they were (plus they were cheaper).

*who knows maybe I'll still find the classic ornament I love too.

Friday, November 11, 2011

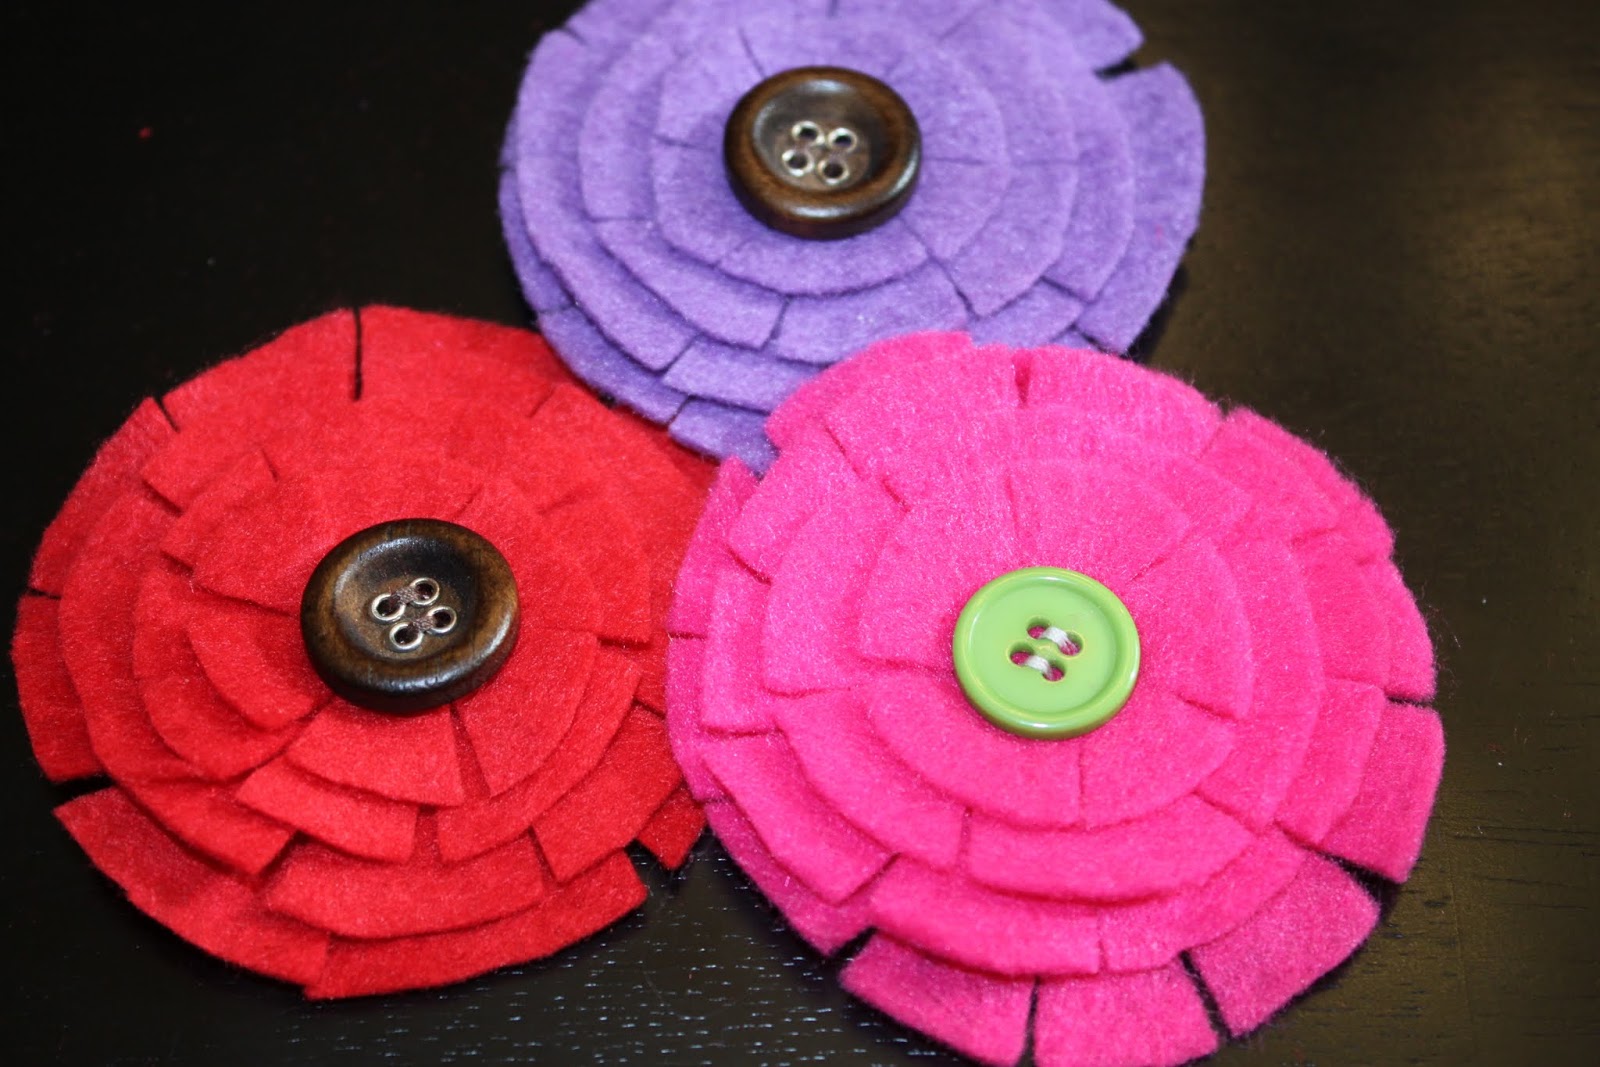
Free Craft Friday -- Felt Flower Hair Accessory

These are so cute and so easy.  Why is it again that I rarely put bows and flowers in my little girls' hair?? (maybe when they get more hair I will :) hehe)  This tutorial can be found here (I love her stuff!)
Step 1.  Cut a small circle out of felt.  Then cut a slightly larger circle using the first circle as a guide.  Then use the second circle as a guide and cut a circle slightly larger than it.  Continue this process until you have the size of flower you like (I did four layers).
Step 2.  Cut slits into all of your circles.  You don't need to cut all the way to the middle as the next layer will cover it and the next and then your button or topper(s).
Step 3.  Cut very small shavings off of the slits you made in the felt.  (the circle on the left is pre-slit cutting and the one on the right is after).  
Step 4.  Stack your cut circle on top of each other.  You can then fasten them with a button or sew them together and then add jewels or other notions to the top.  Glue on an alligator clip to the back.
Notes:  Next time I think I would try these felt bows with nicer felt as I just used the cheaper crafting felt not wool felt. 

Friday, October 21, 2011

Free Craft Friday -- Crochet Scarf

*I suppose I should stipulate now that Free Craft Friday is basically a free pattern...not completely free;  although I like to keep my crafts on the inexpensive side*

Late one night this past week as we were watching TV and I was sitting next to my craft pile (you know the mess on the couch with fabric, notions, glue sticks, yarn and such) I decided it was time to put my yarn to work. My friend who is a crochet master is going to teach me to crochet and read patterns.  But in the meantime I have colorful yarn tempting my hands.  So onto YouTube I search for the easiest tutorial out there.  Found one here, here and here.  And then this happened....

This one is small because it's for my girls but super easy to make  longer/wider

She's trying to be a good model
Nope it's nothing spectacular.  It's definitely a learning project.  But if you don't know how to crochet have no fear YouTube is here (this could be true of many crafts and projects).

Friday, October 14, 2011

Free Craft Friday -- Silk Flower Accessory

* can be used as embellishments on outfits, bags and hair clips...think of the possibilities*

Refabulous' tutorial found here.  These are so much easier than I pictured them being when I saw them in peoples hair and at the stores.  Definitely going to make more of these in the future.  Awesome and easy project.

Materials needed :
-satin or silky type materials (I used what they called "costume satin"...cheaper satin)
-scissors
-candle
-emergency water
-clothes pin
-beads, buttons or jewels (for the middle)
-hair clips
-adhesive glue or glue gun

1. Cut circles from your fabric.  Cut different sizes and colors if you want to mix it up.  They don't need to be perfect circles.  I think it looks just a good (maybe better) when they aren't.

2. Place fabric in clothes pin and skim the edges next to the flame (not too close so it doesn't catch fire).  I held mine so that they drooped in the way I wanted it to curl.

3. Stack your singed circles.  Start with bigger circles and go to smaller.  I like the idea of mixing colors found on the tutorials also.  

4. Sew a few stitches in the middle to hold it together.  I sewed my first bead on with this stitch to save some time.

4.  Apply to your hair clip or bobby pin or other attachment.  Enjoy.

*Be extra cautious as this project does involve an open flame.  Avoid children, pets and anything else dear to you in the process.  Always have water on hand and don't hold material into the flame*

Friday, September 23, 2011

Free Craft Friday -- Fabric Ball

I am playing with the idea of doing what I like to call Free Crafting Fridays.  This will be me finding or coming up with various crafts (sewing, home decor, etc) that you can do for free or at least on the cheap.  I have been finding so many fun craft ideas online recently and this has lead to a little obsession with pinterest.com.  I'm sure many crafters have been on this for years (has it been around that long?) but I'm just wetting my feet.

Anyway I want to try out some of the free sewing patterns and other DIY (do-it-yourself) projects that I've been finding.  Of course I will be giving credit to the people with the original tutorial and will not be listing any tutorial credit myself just tips on what I learned or liked from the project.


Sooooo... to start off I am introducing my fabric beach balls care of Purl Bee's tutorial.  Awesome awesome awesome...thank you for making it so simple and easy to do.  As I was playing with my almost 9 month old twins I realized they were missing something from their arsenal of toys...a ball.  So I hopped online and found this tutorial from Purl Bee, ripped out my flannel scraps and I kid you not had my first ball complete in the space of one nap (an hour and a half).  And now with practice I am even a little faster at making these.  My girls (and hopefully my friends' girls as I'm thinking Christmas presents) are going to love these to play with.

 What 9 month old doesn't have a ball to play with...not my girls anymore that's for sure

Hmmmmm...with that question comes this...I wonder if these could be used as a humanitarian project??

Tuesday, September 13, 2011

Infant Sun Hats

I made it my summer's ambition to make my girls sun hats.  I didn't want to buy a pattern.  So I found a free downloadable pattern online.  How hard could it be?  That's what I thought.  But after more than half a dozen hats "finished" and only one or two that were moderately okay...I broke down...I bought a real pattern.  We were going to visit my parents in Florida in less than a week.  Nothing like cutting it down to the wire.  I finished up the last hat of two the night before our flight.  They turned out pretty darn cute.  I plan to use the same pattern to make fall/winter hats.


 I added a ribbon on the inside so the we could tie the hats on for windy days and boat rides
 I did a zig-zag stitch in order to catch the underside seam also (I missed it the first try)