We were on kind of a tight budget this Christmas. So I did quite a bit of shopping at thrift stores and watching the sales. During my trips to a local thrift store I came upon this table and chairs. You know the kind with padding and vinyl seats (usually some cartoon all over them). Well it was in horrible shape and all the vinyl was ripped and padding falling out. But it was $5 so I gave it a second thought. I wanted to do a table for our twin girls and this price tag screamed "take me home and fix me". So I did. It took a few nights and a couple of naps and an extra $15-20 in supplies but in the end it saved me over the $45 price tag of a "cartoon table" and gave my girls an original without it being branded (which I absolutely love).
Materials:
- junk table and chairs set (I have seen these at thrift stores a couple times since)
- wood filler/putty (large container $10 at Lowes)
Showing posts with label repurpose. Show all posts
Friday, January 11, 2013
Friday, February 17, 2012
Free Craft Friday -- Wire Accessory Organizer
I was cleaning out junk for selling our house when I came across my old wire cube storage. About the time that the wire hit the bottom of my outside trash can the idea of turning them into this occurred to me instead. I dug it out (yep I dumpster dove in my own trash can) and got to work.
Materials
-Wire cube (one side piece no extras)
-Ribbon
-glue gun
-scissors
-lighter
*I made this for FREE but I'm quoting under $5 to include cost of ribbon.
Step 1. Arrange a pattern either in your mind or on the wire cube that you want to follow with your ribbon. Don't worry about pre-cutting ribbon...do this as you go.
Step 2. Loop your ribbon around the back of wire cube and hot glue to the back of ribbon. Then proceed to weave your ribbon through the wire until you get to the opposite side. Pull ribbon tight and wrap it around the wire and got glue to the back again.
*I promise pictures are coming; my laptop crashed a while back and I think these pictures (done before the holidays) went with it.
Step 3. Continue with your pattern by repeating step 2 until it is complete. Then mount on the wall with a couple nails in the corners and you're done. Decorate with hair clips (alligator work best but I've hung snap types over the ribbon also--unsnapped of course)
Step 2. Loop your ribbon around the back of wire cube and hot glue to the back of ribbon. Then proceed to weave your ribbon through the wire until you get to the opposite side. Pull ribbon tight and wrap it around the wire and got glue to the back again.
*I promise pictures are coming; my laptop crashed a while back and I think these pictures (done before the holidays) went with it.
Step 3. Continue with your pattern by repeating step 2 until it is complete. Then mount on the wall with a couple nails in the corners and you're done. Decorate with hair clips (alligator work best but I've hung snap types over the ribbon also--unsnapped of course)
Friday, November 18, 2011
Free Craft Friday -- Tomato Cage Topiary
I saw variations of this on pinterest.com with very little help in the matter of how to make one. So most of this is me winging it but I thought I'd share how I did it.
Tomato Cage Topiary / Christmas Tree
Materials:
-tomato cage (I think mine are 4 ft)
-wire or wire clothes hangers (I tried to do mine on the absolute cheap)
-pliers
-wire cutters (somewhat optional; I didn't use mine)
*under $10 including cost of lights and tomato cage (I believe); cheaper or FREE if you have either on hand.
Step 1. Turn your tomato cage upside down and secure the legs together in a point using the wire/hanger. I tried hemp tie at first so ignore that part.
Step 2. Keep you tomato cage upside down. Unwind you wire hanger and straighten it out. Place your wire/hanger in between two cage wires to fill in space. Put your wire on the outside of the tomato cage wire to help strength it and keep its shape when wrapped with garland or lights.
Step 3. Using the top wire (holding the legs together) hook your wire/hanger over it. In order to use one hanger for the height of the "tree" this hook was rather small made by bending it over itself with the pliers, placing it over the wrapped wire and then pinching it closed with the pliers.
Step 4. Stretch the wire to the bottom rung wire of your cage and then loop it over like the top and pinch it shut with pliers.
Tomato Cage Topiary / Christmas Tree
Materials:
-tomato cage (I think mine are 4 ft)
-wire or wire clothes hangers (I tried to do mine on the absolute cheap)
-pliers
-wire cutters (somewhat optional; I didn't use mine)
*under $10 including cost of lights and tomato cage (I believe); cheaper or FREE if you have either on hand.
Step 1. Turn your tomato cage upside down and secure the legs together in a point using the wire/hanger. I tried hemp tie at first so ignore that part.
If your tomato cage is like mine there it too much space between the wire to have a nice rounded shape when wrapped in garland or lights. It comes off looking more like a triangle than a "tree".
Step 3. Using the top wire (holding the legs together) hook your wire/hanger over it. In order to use one hanger for the height of the "tree" this hook was rather small made by bending it over itself with the pliers, placing it over the wrapped wire and then pinching it closed with the pliers.
Step 4. Stretch the wire to the bottom rung wire of your cage and then loop it over like the top and pinch it shut with pliers.
Step 5. Repeat steps 2 through 4 to fill in the other spaces around the "tree".
Finished cage/"tree" should look something like this; the top swirl wire is just my excess from wiring the legs together. Click on the picture to enlarge it if this helps.
Step 6. If you do place it into a pot or on the ground it never hurts to secure it. This could be done with little stakes or even bent pieces of hanger looped over the bottom wire and stuck into the ground.
Don't love this picture. I think they look better in person but maybe I'm a little biased.
I wrapped lights around mine but you could also use garland and other decorations. I think next year I may try a combination of lights and garland.
* I also saw instructions on how you can use this for ivy plants or other vine growing plants in the summer. Awesome!
If you happen to use this tutorial or link to it I'd love to know. Please leave a comment. Thanks!
Free Craft Friday -- Holiday Card Boxes
I love to repurpose things. It saves money and it makes something useful out of something that may have otherwise been thrown in the trash. Here is one that my aunt taught me years ago on reusing old holiday cards or the cards that you've gotten in years past.
Holiday Card Boxes
Materials
-old holiday cards (blank or written in it doesn't matter)
-scissors
-tape
-ruler or straight edge (I used a book)
-pen or pencil
Holiday Card Boxes
Materials
-old holiday cards (blank or written in it doesn't matter)
-scissors
-tape
-ruler or straight edge (I used a book)
-pen or pencil
Step 1. Tear your card in half down the fold line. Draw an "X" on the card by drawing a straight line from corner to corner.
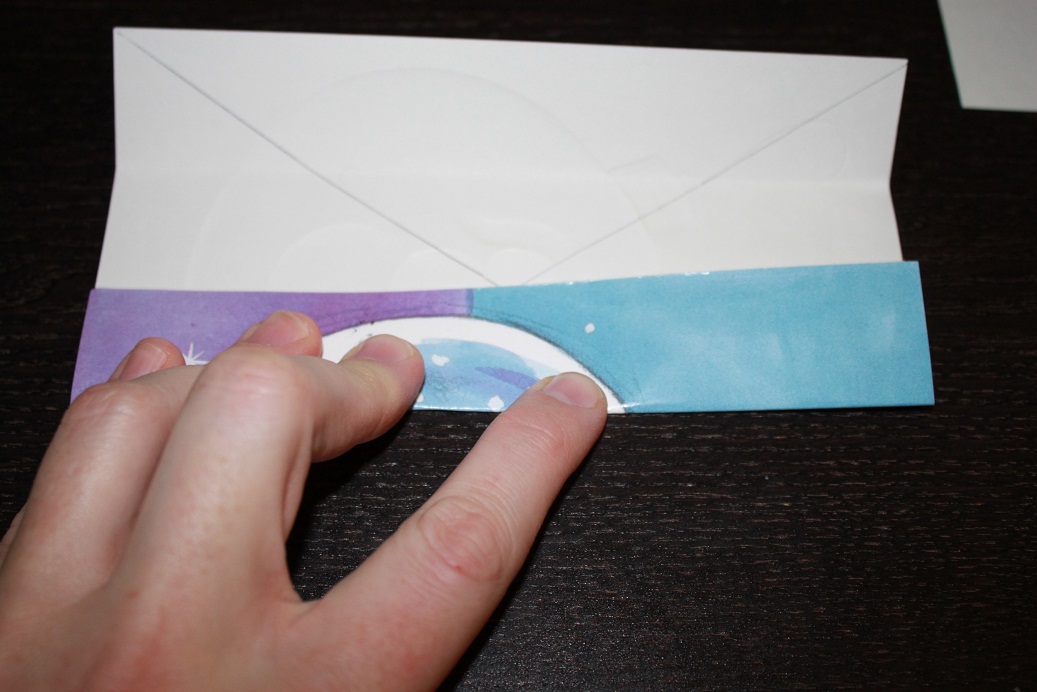
Step 2. Taking your top first (half with the design) fold all edges to the center of the "X". Crease these folds firmly.
Step 3. Your card should have fold lines that create 9 squares. Cut a slit in the card along the 2 side folds until it meets with the perpendicular fold (as shown). The slit fold is typically longer than the side folds adjacent to it.Step 4. Fold the two shorter side pieces into the middle of the box and then fold the end piece over the two side pieces. Tape this down to secure it. Repeat this step for the opposite side. This form the lid to your box.
Step 5. Repeat steps for the bottom of the box with the exception that when you fold to the center "X" you will want to fold just slightly over the center (as pictured; in order to make the inside of the box a tiny bit smaller so it will fit inside).
Step 6. Insert the lid of the box over the body of the box and you are ready to go. These are fun for stocking stuffers, small presents and treat boxes. Could be fun for advent calendars, tree minatures and all sorts of other things too. I also used to use them for my Barbies (shows you how old I was when I learned this hehe). Also I trimmed a little off the bottom of some cards before splitting them in half...this made for more square boxes. I love the variety you can get...unfortunately I didn't save any last year so these are all from the same box/style.
Friday, October 28, 2011
Free Craft Friday -- Tea Dyed Onsie or Shirt
*I heard about tea dying through a Pinterest pin and loved the idea and decided a little interchangeable flower would be the perfect finishing touch*
Materials:
-new pre-washed onsie or shirt (used onsies or shirts will cause uneven dying; I tried this first and had darker stain around drool prone spots)
-Black Tea (I also tried Koolaid and Green Tea...Black seemed to work best)
-Lace or embellishments
-needle and thread or sewing machine
-bowl and boiling hot water
Step 1 : Boil water and place tea bags into water. I used about 4 cups of water and 4 tea bags. Let the tea soak and stir it to mix evenly.
Step 2 : Soak your onsie in the tea-water. I left my tea bags in. It may work better for even color to take them out.Step 3 : Wring out minimally and air dry onsie. Once it is air dried then wash and dry it in the laundry.
Step 4: Lay out lace embellishment over the shirt. Cut extra length on both sides. For some reason my lace ran shorter as I sewed it on (I'm sure a pro sewer could tell you why)
Step 5: Pin the lace loosely down on the garment to keep it in place. Sew the lace down. I used the thicker trim of my lace to hide the thread and only sewed the top edge.
*hopefully you should have a little excess lace on both edges of the garment like this*
Step 6: Sew the hanging lace down into the seam of the onsie. Make sure you don't catch under-layers of the onsie when doing this.Step 7: Trim off the excess lace. Repeat steps 4 - 7 to add layers of lace if desired.
Step 8 (optional): Sew on a loop to attach embellishments to. I used an alligator hair clip that I use with flower headbands to gauge the width of the thread loop. I then sewed over it 5 or 6 times to make a secure loop to attach embellishments to. Tie this off on the inside of the garment.
*finished shirt with lace and loop. The thread loop somewhat blends in also so you don't have to attach anything if you chose*
Friday, October 7, 2011
Free Craft Friday -- Paper Tree
I took this idea from Everyday Mom Ideas that I found on Pinterest.com and then tweaked it a little for my own preference. Their example is for a spring tree (bright colors) and since fall is upon us I decided that a fall tree would be more appropriate (warm colors). Also I wasn't in love with the green florist wire showing up on a brown tree limb so I decided to paint the tree branches black first and then buy black crafting wire instead. It turned out (or is turning out) to look pretty darn great if you ask me.
Materials / Cost
- tree branches / FREE
- paint / FREE
- scrapbook paper / $2.00
- wire / $3.00
- vase / $1.50 at my local thrift store (or free if you have one in storage)
- I found a branch someone had pruned off their maple tree during an evening walk and felt it was fate speaking to me about this project that I had bookmarked in my brain for the last couple of weeks.
- I peeled all of the leaves off and painted it black with some indoor/outdoor acrylic paint I had lying around.
- I cut my leaf patterns out of scrapbook paper using a leaf that was on the tree. I folded my paper into pieces wide enough to fit the leaf and then after cutting one leaf out used this are my pattern. I matched up the same paper for both sides of the leaf.
- Then I glued the paper onto the wire as instructed in the tutorial. I also decided that the leaves look more natural with a little curve to them.
The end. Super easy. Super cheap. Hoping to enjoy it for seasons to come.
Materials / Cost
- tree branches / FREE
- paint / FREE
- scrapbook paper / $2.00
- wire / $3.00
- vase / $1.50 at my local thrift store (or free if you have one in storage)
it's a work in progress
- I peeled all of the leaves off and painted it black with some indoor/outdoor acrylic paint I had lying around.
- I cut my leaf patterns out of scrapbook paper using a leaf that was on the tree. I folded my paper into pieces wide enough to fit the leaf and then after cutting one leaf out used this are my pattern. I matched up the same paper for both sides of the leaf.
- Then I glued the paper onto the wire as instructed in the tutorial. I also decided that the leaves look more natural with a little curve to them.
The end. Super easy. Super cheap. Hoping to enjoy it for seasons to come.
Subscribe to:
Posts (Atom)