Showing posts with label Free Craft Friday. Show all posts

Friday, June 22, 2012

Free Craft Friday -- Keepsake Pillow

My husband and I first met in person on August 14, 2006.  He work a t-shirt from his favorite band at the time (Lagwagon) and I wore a black shirt with these camoflauge cargo shorts.  We had an amazing first date.  He took me to a restaurant that his family visited every Labor Day weekend.  I joked it was a dive as it was the first time I'd eaten there although I lived much closer to it than he.  We laughed over "stupid ash chicken" they had burnt my orange chicken and went on to enjoy the movie Goonies at the movies in the park in Ogden.  A little over a year later we were married in October 2007.  The t-shirt and shorts were still frequently worn and finally this summer (2012) they both had enough.  His t-shirt had developed holes at the seams and armpits and my shorts finally split down the inseam.  I didn't really want to get rid of either item.  So I asked my husband if he would mind if I turn his favorite t-shirt into a keepsake of our first date.  He agreed and this totally awesome pillow was born.

Keepsake Pillow

Materials:
-significant clothing from dates, special occassions, etc.
-scissors
-pins
-thread and need or sewing machine


Step 1.  Determine the size of pillow you wish to make.  Make sure you have enough material to cover this size.  You could a pillow form but I decided to just use some extra batting/stuffing I had left over from another project.


Step 2.  Piece your project together.  For me this meant measuring my husbands t-shirt to include the image as well as some material for bordering.  I was then able to piece together a back on the pillow with my shorts.  I cut them apart at the seams and tried to use the least worn pieces for the pillow.  I then pinned the back together and sewed this first (really a mesh of different sizes and shapes).  I pieced the back together making sure that it would oversize the t-shirt piece (size of pillow).


Step 3.  Trim down both from and back pieces of material to be the same size.  In my case I trimmed the shorts to be the same size as the t-shirt piece.  I laid out the t-shirt on top of my sewn shorts and then trimmed off the excess.

Step 4.  Pin both pieces with right sides together and sew along the outter edge with a 1/2" seam.  Leave a hole approximately 2 to 3" in order to stuff the pillow.  If you use a pillow form this "hole" will need to large enough to put your pillow in.

Step 5.  Stuff your pillow.  To finish use needle and thread to sew up the opening in the pillow with an invisible stitch.

*I'm sure there are other ways to form a pillow with remnant clothing, etc.  I simply went with the simplest of ways and one that I knew I would have enough material for.   And yes the pictures are crap on this one...serves me right for using my less than desirable camera.

Friday, June 15, 2012

Free Craft Friday: Applique and Disney Outfits

Every leap year my husband's family celebrates their tradition of going to Disneyland together.  I have enjoyed this tradition twice with his family now and I think it's a great way to not overdo Disney and still keep it magical.

For this trip (February 2012...old project haha) I decided to make the girls a Minni Mouse shirt.  I had found some red with white polka dot material in the remnant bin at Hancock Fabrics a few months before and knew I could put it to use for a fun Disney outfit for them.  A couple weeks before the day I found that I hadn't even touched the project so I went to work.  I searched online for a template for Mickey Mouse ears and discovered people wanted to charge me $4 or more.  No thanks.  I hopped on a Google Docs and made a super simple template myself in about 10 minutes. Mickey Mouse Template here (let me know if it doesn't work).

Next I looked up a few different tutorials on doing applique (Plaid Apple and Sew Mama Sew were my go to blogs on this). 
materials needed (polka dot material not present)
Minnie Mouse Onsie / Applique

Materials:
-onsie or shirt
-red and white polka dot material
-black material
-Wonder Under or other fusible interfacing
-stablizer or you can use lightweight interfacing (keeps your stitches from puckering)
-sewing materials (sharp sewing scissors help a lot)
-iron

Step 1. Prewash your fabrics and onsies. I am horrible at this but it's an important step especially with applique and sewing different fabrics together.

Step 2.  Trace and cut your template for applique from the Wonder Under.  Mickey made it easy as I didn't have to reverse the image or such but keep that in mind depending on how complicated you get. Iron on the Wonder Under peice to the wrong side of your fabric.
 Wonder Under cut into pattern and ironed on to "wrong" side of fabric"

Step 3.  Peel off the paper backing of the Wonder Under once your peice has cooled.  This was my first time doing applique and I swear this was not a step in any tutorial and I tried to iron the peice on with the paper attached (silly me). 
peel off the paper leaving the adhesive behind

Step 4.  Iron the sticky side down of your fabric peice to the shirt or item you want it attached to.

Step 5.  Iron on stabilizer or pin it to the inside of your garment.  This will keep the stitching even and prevent ruffle and other uneven looking applique messes. 

Step 6.  Using a sewing machine or by hand, sew around the outside of the applique.  Try to keep your stiches close to the border and very even...overlapping to prevent fray or allowing for fray if you wish, depending on style.

Gathered Skirt (Addition)
After the applique onsie/shirt was complete I used the red and white polka dot material to add a simple gathered skirt to each onsie. Then I simply put a pair of red and black leggings under each girls' outfit and we were good to go. Literally finishing touches (the bows) were added only hours before our flight.

Step 1.  Sew hems on both top and bottom of skirt.  Then sew a long "baste" stitch with your machine along the top of the skirt.  DO NOT reverse stitch or "lock" your baste stitching.
 gather material with a basic sewing machine..."baste stitch" and keep your thread long at both ends

Step 2.  Keep the thread long at both ends of the peice of fabric.  Once you have the baste stitch complete find the bottom/bobin thread (bottom of hem/stitch) and gently pull on this and gather your skirt across. 
pull the bottom thread or threads in this case and voila...cute gathered skirt

Step 3.  Pin the skirt to the shirt or onsie to get your spacing/gathering just right and then sew the back seam together with right sides together.  Once back seam is complete then sew the skirt to the onsie or shirt.  

finished product without the bow


Basing my under $10 estimate on $3 onsie, $2 remnant fabric, $5 Wonder Under (not using nearly all of it) and having some other supplies on hand.
My girls living it up in Disneyland with their Minnie Mouse themed outfits

Friday, May 25, 2012

Free Craft Friday -- Bookmarks

Hello? Miss me?  I have been off in my real life for quite some time.  Also the giveaway never really did anything so I gave up some interest in this blog.  But mostly things were pretty busy and have only started feeling a little more in control.  We had our house on the market, we updated the kitchen, which then had two offers directly after the remodel (apparently an update sells houses quick), so then we packed up and moved out in somewhat of hurry and now we have settled into my in-laws basement temporarily (ie living the dream).  But we are hoping to turn around and find the perfect home and location soon.
So anyway as luck would have it as we were packing up I found an old craft that I did a number of years ago.  I decided to bring this project with me to our new digs to give myself something to do.  Basically this craft is using embroidery thread to make bookmarks.

 Materials:
embroidery thread (I usually use between 4-6 strands of coordinating colors)
beads (small, medium, large and decorative)
scissors
clamp/clothes pin (optional)

Step 1:  Decide on a color scheme and general look you want for the bookmark.  I like to add heavier beads to dangle off the ends.  Use small beads or no beads for the part of the bookmark that will go inside the book.

Step 2:  If you use a long piece you can start a knot at the length of "dangle you want on the first end.  Then just let creativity flow...add beads, charms, decorative knotting and braiding, etc to make your bookmark end.

Step 3:  Once you have one end of your bookmark done, work through the middle.  I usually only braid or use very small bead with this part.  It will only be seen by the reader, it allows the book to close easily and also you don't want to damage the book pages with large beads.  When you finish the length you need for the book tie a knot leaving yourself room to add another "tail" to the book mark.

Step 4:  Similar to Step 1 work beads and charms onto the tail end of the bookmark.  I like to knot between each section or theme of beading to keep things more separate and pleasing to my eye.  Make sure to knot the ends of each tail securely.  I also recommend using super glue to keep it from coming loose.

Step 5:  Place in a book for decoration, use this with your reading or give as a gift.  Who knows maybe this craft will become obsolete if Kindles and tablets keep taking over the world of book.

Friday, February 17, 2012

Free Craft Friday -- Wire Accessory Organizer

I was cleaning out junk for selling our house when I came across my old wire cube storage.  About the time that the wire hit the bottom of my outside trash can the idea of turning them into this occurred to me instead.  I dug it out (yep I dumpster dove in my own trash can) and got to work.

Materials
-Wire cube (one side piece no extras)
-Ribbon
-glue gun
-scissors
-lighter
*I made this for FREE but I'm quoting under $5 to include cost of ribbon.

Step 1.  Arrange a pattern either in your mind or on the wire cube that you want to follow with your ribbon.  Don't worry about pre-cutting ribbon...do this as you go.

Step 2.  Loop your ribbon around the back of wire cube and hot glue to the back of ribbon.  Then proceed to weave your ribbon through the wire until you get to the opposite side.  Pull ribbon tight and wrap it around the wire and got glue to the back again.

*I promise pictures are coming;  my laptop crashed a while back and I think these pictures (done before the holidays) went with it.

Step 3.  Continue with your pattern by repeating step 2 until it is complete.  Then mount on the wall with a couple nails in the corners and you're done.  Decorate with hair clips (alligator work best but I've hung snap  types over the ribbon also--unsnapped of course)

Friday, January 27, 2012

Free Craft Friday -- Gripper Socks

In theory these look like a great idea right?  I thought so too.  Our one-year old twins are up and cruising but socks cause slipping.  And laminate floor causes cold toes.  And I didn't want to buy a bunch of socks with gripping.  So I bought some puff paint ($1 a bottle) and put these together.  Maybe if I had older kids they could comment as to the effectiveness but I can't tell the difference beyond them becoming more sure footed.  But they were fun to make and a cute touch.


Friday, January 13, 2012

Free Craft Friday -- Seat Belt Covers

We recently transitioned the girls into convertible car seats (still rear facing...they don't even weigh 20 lbs if we wanted to turn them around haha).  I thought this would get rid of the "belt burn" that Seren often got on her neck when we tightened the belts down with the infant seats.  It didn't.  Kendall even got one or two with this new seat style.  They weren't a fan of them of course so I went online and found these adorable seat belt covers and an awesome tutorial by Jess at CraftinessIsNotOptional.  Once again I'm not going to post a tutorial because this one is awesome...no need to even modify.

-3 3/4" long; fit and used on my Evenflo Tribute carseats

-P.S.  Most instruction manuals will say that you can't add anything to the seat or it compromises the safety.  I feel okay putting these on the seat as they are small and don't seem to change how the belt or harness works or fits (I'll try to snap a picture once in place...or check out the tutorial pictures).  Anyone with more experience or knowledge have more to say or feel on this topic?  (I'm curious and not out to argue;  I think we can safely say we are all in it for our kids' safety)

-my under $5 estimate is based on the fact I bought materials to make 2 sets of seat belt covers for around $8...so one set would be relatively cheap (plus I bought too much fabric and have quite a bit left over).

Friday, December 2, 2011

Free Craft Friday -- Paint Splatter Ornaments

Materials:
-clear ornaments ($3 estimate; Michaels with 40% coupon)
-acrylic paint ($1 a bottle)
-paint thinner
                                    

Step 1.  Put a couple drops of you first color into the ornament.  Add just a small amount (drops) of paint thinner into the ornament.  You might need to use a tooth pick or other stick to mix the two a little.  Hold a gloved (or sandwich bagged) finger over the open end of the ornament and shake like crazy.

Step 2.  Put a couple drops of your second color and paint thinner into the ornament.  Shake like crazy yet again.

Step 3.  Once you have achieved your desired look leave the ornament cap off and allow the ornaments to air out overnight (outside wouldn't be a bad idea).  Place the caps on after airing out and bingo bango you have an awesome ornament. 

*varying your paint and paint thinner combination will affect results...have fun and experiment.  The red/white one had a little more paint thinner and the green/red one had less.*

                                   
*another set we made that year (I don't like these as much).  Paint the outside with Christmas scenery or whatever pleases you and then add miniature items inside the ornament*

- I consider this a kid-friendly craft when properly supervised by adults due to paint thinner being involved.

-We made these a few years ago so pricing is estimated.  Notion 2 Craft original means I didn't find this idea on another blog...I'm sure it's not that original though ;) 

Friday, November 18, 2011

Free Craft Friday -- Tomato Cage Topiary

I saw variations of this on pinterest.com with very little help in the matter of how to make one.  So most of this is me winging it but I thought I'd share how I did it.

Tomato Cage Topiary / Christmas Tree

Materials:
-tomato cage (I think mine are 4 ft)
-wire or wire clothes hangers (I tried to do mine on the absolute cheap)
-pliers
-wire cutters (somewhat optional; I didn't use mine)

*under $10 including cost of lights and tomato cage (I believe); cheaper or FREE if you have either on hand.

Step 1.  Turn your tomato cage upside down and secure the legs together in a point using the wire/hanger.  I tried hemp tie at first so ignore that part.


If your tomato cage is like mine there it too much space between the wire to have a nice rounded shape when wrapped in garland or lights.  It comes off looking more like a triangle than a "tree".

Step 2. Keep you tomato cage upside down.  Unwind you wire hanger and straighten it out.  Place your wire/hanger in between two cage wires to fill in space.  Put your wire on the outside of the tomato cage wire to help strength it and keep its shape when wrapped with garland or lights.

Step 3.  Using the top wire (holding the legs together) hook your wire/hanger over it.  In order to use one hanger for the height of the "tree" this hook was rather small made by bending it over itself with the pliers, placing it over the wrapped wire and then pinching it closed with the pliers.

Step 4.  Stretch the wire to the bottom rung wire of your cage and then loop it over like the top and pinch it shut with pliers.
Step 5.  Repeat steps 2 through 4 to fill in the other spaces around the "tree".
Finished cage/"tree" should look something like this; the top swirl wire is just my excess from wiring the legs together.  Click on the picture to enlarge it if this helps.

Step 6.  If you do place it into a pot or on the ground it never hurts to secure it.  This could be done with little stakes or even bent pieces of hanger looped over the bottom wire and stuck into the ground. 

Don't love this picture.  I think they look better in person but maybe I'm a little biased.

I wrapped lights around mine but you could also use garland and other decorations.  I think next year I may try a combination of lights and garland.

* I also saw instructions on how you can use this for ivy plants or other vine growing plants in the summer.  Awesome!

If you happen to use this tutorial or link to it I'd love to know.  Please leave a comment.  Thanks!

Free Craft Friday -- Holiday Card Boxes

I love to repurpose things.  It saves money and it makes something useful out of something that may have otherwise been thrown in the trash.  Here is one that my aunt taught me years ago on reusing old holiday cards or the cards that you've gotten in years past.

Holiday Card Boxes

Materials
-old holiday cards (blank or written in it doesn't matter)
-scissors
-tape
-ruler or straight edge (I used a book)
-pen or pencil
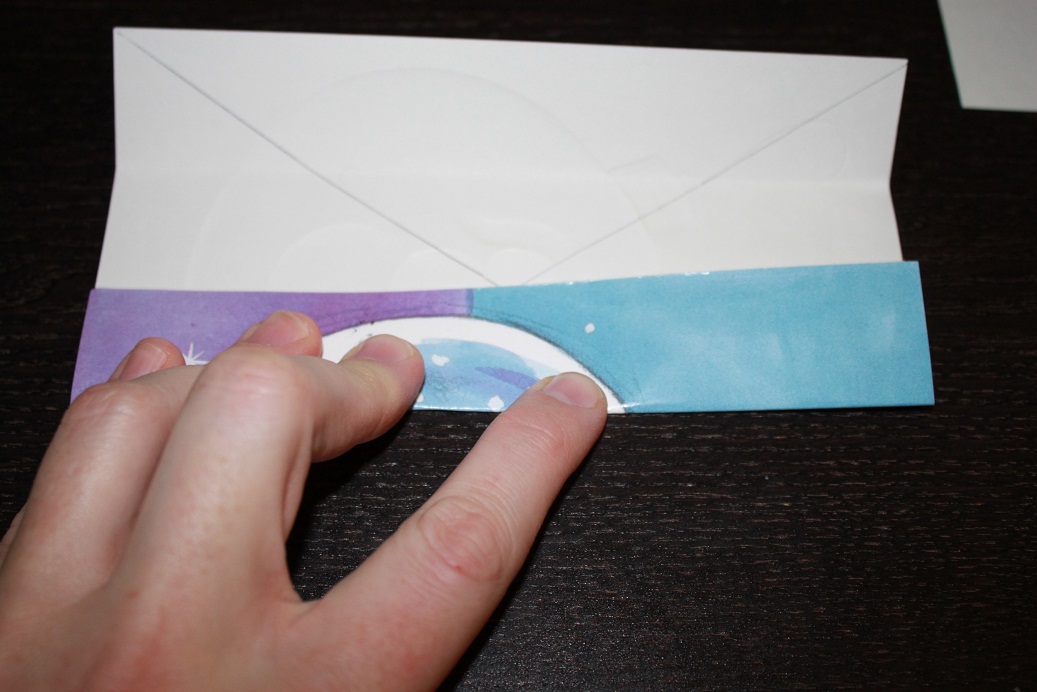
Step 1.  Tear your card in half down the fold line.  Draw an "X" on the card by drawing a straight line from corner to corner. 
Step 2.  Taking your top first (half with the design) fold all edges to the center of the "X".  Crease these folds firmly. 
Step 3.  Your card should have fold lines that create 9 squares.  Cut a slit in the card along the 2 side folds until it meets with the perpendicular fold (as shown).  The slit fold is typically longer than the side folds adjacent to it.
Step 4.  Fold the two shorter side pieces into the middle of the box and then fold the end piece over the two side pieces.  Tape this down to secure it.  Repeat this step for the opposite side.  This form the lid to your box. 

Step 5.  Repeat steps for the bottom of the box with the exception that when you fold to the center "X" you will want to fold just slightly over the center (as pictured; in order to make the inside of the box a tiny bit smaller so it will fit inside). 
Step 6.  Insert the lid of the box over the body of the box and you are ready to go.  These are fun for stocking stuffers, small presents and treat boxes.  Could be fun for advent calendars, tree minatures and all sorts of other things too.  I also used to use them for my Barbies (shows you how old I was when I learned this hehe).
Also I trimmed a little off the bottom of some cards before splitting them in half...this made for more square boxes.  I love the variety you can get...unfortunately I didn't save any last year so these are all from the same box/style.

Friday, November 11, 2011

Free Craft Friday -- Felt Flower Hair Accessory

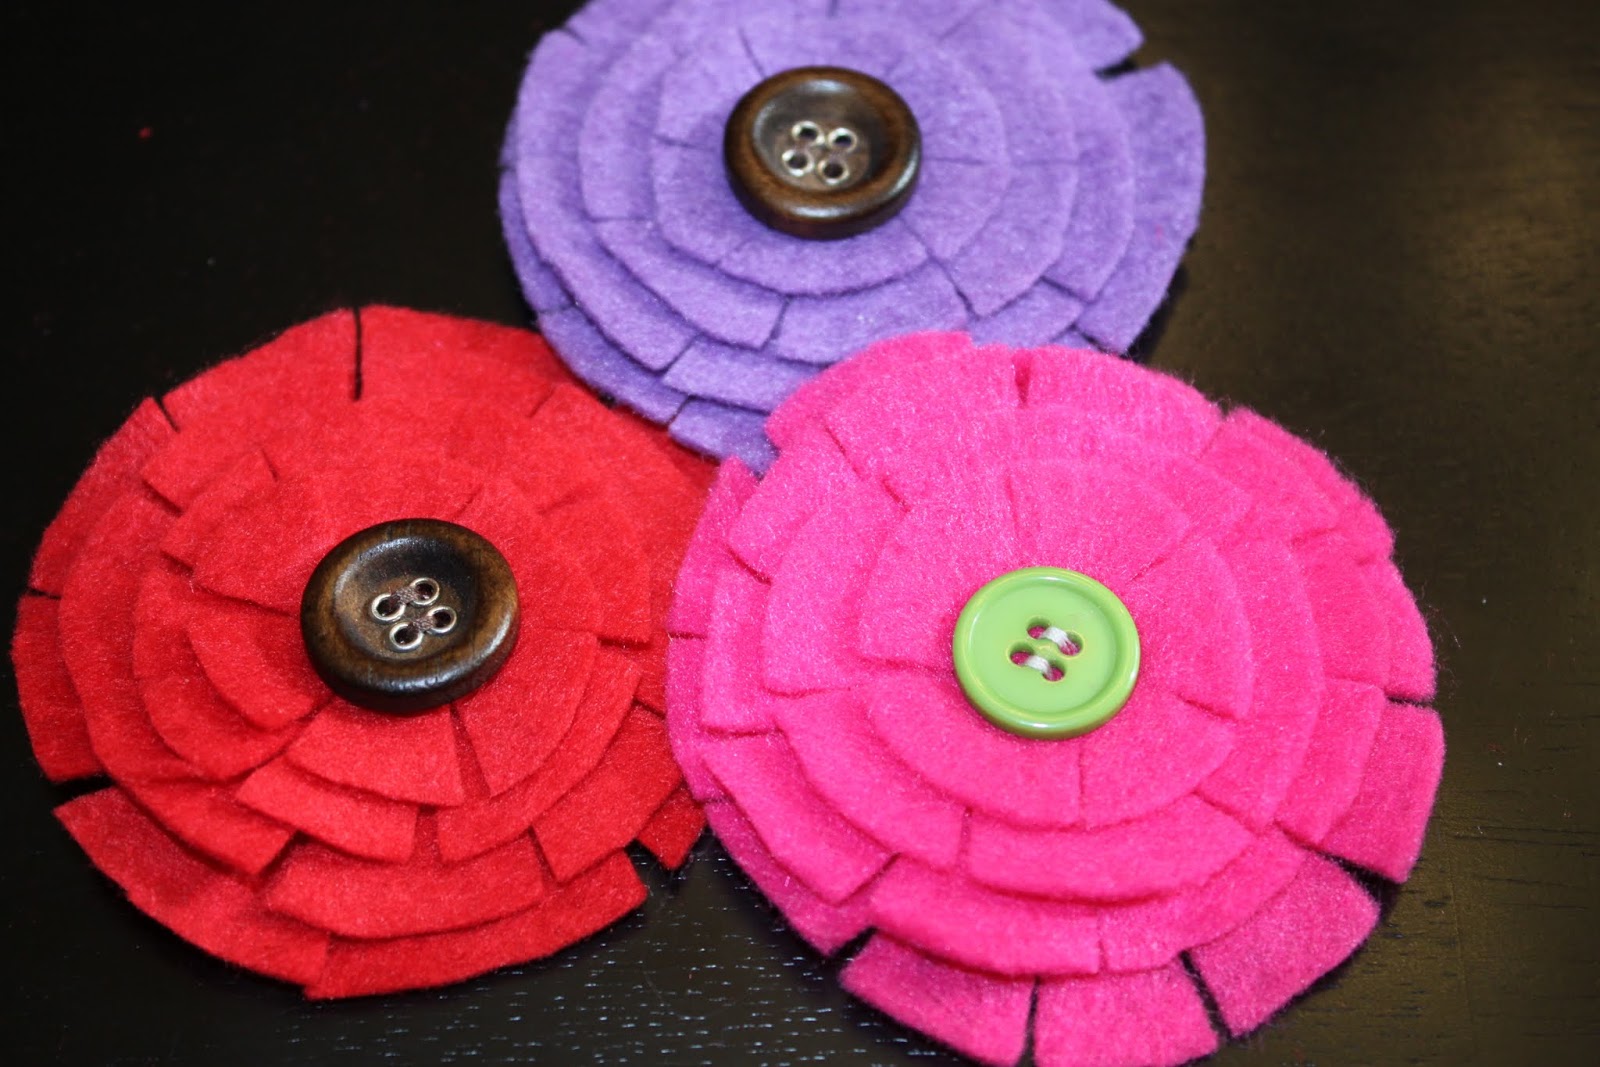
These are so cute and so easy.  Why is it again that I rarely put bows and flowers in my little girls' hair?? (maybe when they get more hair I will :) hehe)  This tutorial can be found here (I love her stuff!)
Step 1.  Cut a small circle out of felt.  Then cut a slightly larger circle using the first circle as a guide.  Then use the second circle as a guide and cut a circle slightly larger than it.  Continue this process until you have the size of flower you like (I did four layers).
Step 2.  Cut slits into all of your circles.  You don't need to cut all the way to the middle as the next layer will cover it and the next and then your button or topper(s).
Step 3.  Cut very small shavings off of the slits you made in the felt.  (the circle on the left is pre-slit cutting and the one on the right is after).  
Step 4.  Stack your cut circle on top of each other.  You can then fasten them with a button or sew them together and then add jewels or other notions to the top.  Glue on an alligator clip to the back.
Notes:  Next time I think I would try these felt bows with nicer felt as I just used the cheaper crafting felt not wool felt. 

Friday, November 4, 2011

Free Craft Friday -- Rag Quilt (part one)

Okay I admit it.  I was slacking off this week.  We have been dealing with two sick babies and although I have some projects in the works...they just aren't happening anytime soon.  So instead I'm sharing a rag quilt that is in process (ie all over my family room floor).  I made one of these for my friend's baby shower last year using this tutorial and love how it turned out.

Step 1.  Determine the size of quilt you want to make.  I typically decide on the size of square I want and then based on that determine how many squares and yards of fabric I will need.  For this quilt I'm working on I did 8 inch squares and did a 6 square by 8 square size (4 ft by 5 1/3 ft).  Also keep in mind that you have a 1/2 seam that will be sewn and snipped around each square and the outside.  

Step 2.  Lay out your selection/pattern (one front and one back) with squares.  You can do the same pattern front and back or change it up on the back or do a solid (too many choices).  Once you have determined the pattern pin them together with wrong sides together.  Sew an X through each square (picture below).
Step 3.  Keeping your pattern in order pin strips horizontally together (as pictured below) and sew a 1/2" seam with "wrong sides"/back squares together.
Step 4.  Once you have your horizontal strips pieced together and sewn your next step is to pin them together.  Pin the same way (so that 1/2" seam is toward the front of blanket).  Pin the seams from Step 3 together so that the underside seam (held by my forefinger) goes flat on the machine and the top lays toward the needle (held by my thumb).  This will keep your material thinner and save your needle.  Also by laying it this way the underside will not bunch and you are able to see the top and prevent bunching.  The video tutorial explains this really well.
Step 5.  Your blanket will look something like this once you have the horizontal strips sewn together.

....stay tuned for how my rag quilt turns out.

Friday, October 28, 2011

Free Craft Friday -- Tea Dyed Onsie or Shirt

*I heard about tea dying through a Pinterest pin and loved the idea and decided a little interchangeable flower would be the perfect finishing touch*

Materials:
-new pre-washed onsie or shirt (used onsies or shirts will cause uneven dying; I tried this first and had darker stain around drool prone spots)
-Black Tea (I also tried Koolaid and Green Tea...Black seemed to work best)
-Lace or embellishments
-needle and thread or sewing machine
-bowl and boiling hot water


Step 1 : Boil water and place tea bags into water.  I used about 4 cups of water and 4 tea bags.  Let the tea soak and stir it to mix evenly.
Step 2 :  Soak your onsie in the tea-water.  I left my tea bags in.  It may work better for even color to take them out.

Step 3 :  Wring out minimally and air dry onsie.  Once it is air dried then wash and dry it in the laundry.

Step 4:  Lay out lace embellishment over the shirt.  Cut extra length on both sides.  For some reason my lace ran shorter as I sewed it on (I'm sure a pro sewer could tell you why)
Step 5:  Pin the lace loosely down on the garment to keep it in place.  Sew the lace down.  I used the thicker trim of my lace to hide the thread and only sewed the top edge.
*hopefully you should have a little excess lace on both edges of the garment like this*
Step 6:  Sew the hanging lace down into the seam of the onsie.  Make sure you don't catch under-layers of the onsie when doing this.
Step 7:  Trim off the excess lace.  Repeat steps 4 - 7 to add layers of lace if desired.
Step 8 (optional):  Sew on a loop to attach embellishments to.  I used an alligator hair clip that I use with flower headbands to gauge the width of the thread loop.  I then sewed over it 5 or 6 times to make a secure loop to attach embellishments to.  Tie this off on the inside of the garment.
 *finished shirt with lace and loop.  The thread loop somewhat blends in also so you don't have to attach anything if you chose*